Documentation Index
Fetch the complete documentation index at: https://docs.redbrickai.com/llms.txt
Use this file to discover all available pages before exploring further.
Brush Tool
The Brush Tool has two modes - 2D and 3D (toggled on the right-side panel). The 2D brush is a circle, and the 3D brush is a sphere that segments across slices. You can adjust the size of the brush using the slider in the right hand Context Panel or theW & S hotkeys.
Left click + drag to segment and right click + drag to erase.Adaptive Brush
The Adaptive Brush automatically defines the edges of the structure you are annotating, resulting in a smarter and more accurate workflow. The Adhesion parameter allows you to determine how “strict” the Adaptive Brush is with similar intensity values. A lower Adhesion value, for example, would be recommended for annotating regions or structures with smooth gradients, whereas a higher Adhesion value would be best for annotating with sharper gradients.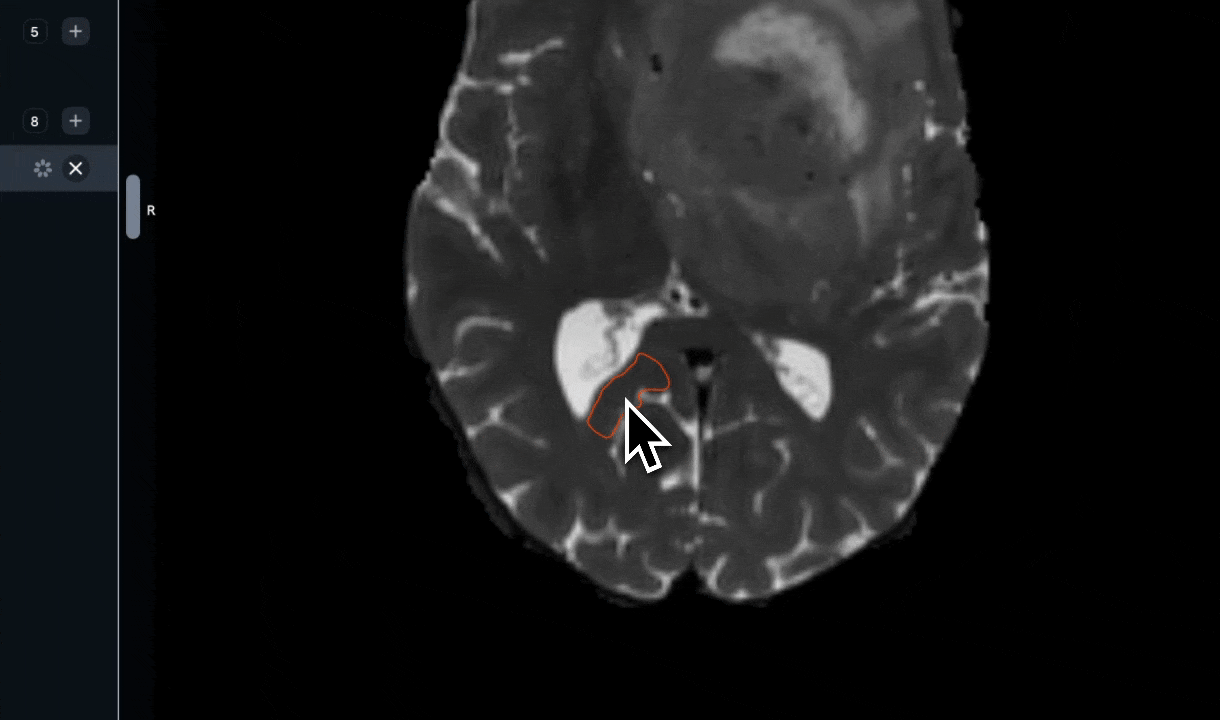
Adaptive Brush Mastery: we recommend adjusting your Windowing (and other Visualization) settings along with your Adhesion levels to ensure optimal brush behavior.
Pen Tool
The Pen tool allows you to annotate using a free-form contour on 2D slices.Left click + drag to add a segment region and Right click + drag to remove a region.3D Scissor Tool
The Scissor tool allows you to erase the unwanted section of your segmentation in the 3D view plane.Left click + Drag to erase the unwanted section
Region Growing (Grow Tool)
The Grow Tool is a semi-automated tool that uses image intensity information to segment regions. By clicking and holding in a region, the segmentation will grow outward from the point that you clicked on. The longer you hold, the longer the region will grow.Left click + hold (+ drag) to segment, right click + hold (+ drag) to erase.Contour Tool
The contour tool lets you interact with masks as contours. Interacting with masks as contours gives you special tools to create and edit annotations.Creating a Contour from Scratch
Select the contour tool, and click and drag on the canvas to draw a contour. To complete the contour, simply intersect the initial node or any other edge of the contour.- Node edit. Select an existing mask and select the contour tool. When you hover over an edge, you will see a node with a “target spline” appear. You can drag this node to edit the “target spline” area interactively.
Edge Selection
The Edge Selection Tool is a semi-automated tool that uses pixel intensity information to automatically generate a contour around a designated region of interest. To use the Edge Selection Tool:- Hover your mouse over the border of a region to generate a preview contour.
- Use
LMB/left clickto generate a contour based on your preview. (Or,RMB/right clickto erase a contour). - Without releasing
LMB, drag your mouse away from the click point to smooth the edge of your contour. - Once your contour has been generated and smoothed to your liking, release
LMB.
Interpolate
The Interpolate Tool allows you to quickly generate contours across a range of slices and is an excellent way to quickly generate accurate 3D annotations. In order to use the Interpolate Tool:- Create a new Entity and generate two annotation masks using any Segmentation Tool (for example, create a mask on Slice 70 and a mask on Slice 80)
- Select the Interpolate Tool
- Navigate to Slice 70 and hover over the annotation mask. Once the edge glows red, use
LMB/left clickto select it. - Repeat Step (3) with the mask on Slice 80.
- Voila! The Interpolate Tool has generated annotations on all slices between Slice 70 and Slice 80.
Hole Filling Tool
The Hole Filling Tool iteratively fills small holes in your segmentation. Click anywhere on the canvas to start filling in small holes.The Hole Filling Tool is designed to fill small holes. For larger holes, you may need to run the Hole Filling Tool more than once (i.e. click several times).
Paint Bucket Tool
The Paint Bucket is helpful for closing single large holes. With the paint bucket tool selected, click in any large hole to fill it automatically.Island Removal Tool
Island Removal deletes “islands” of segmentations. Simply click on any island segmentation to remove it. Conversely, you can enable Keep Currently Selected in the right hand Context Panel to remove all of the islands except the one you clicked on.Boolean Operator Tool
The Boolean Operator Tool allows you to perform four operations on segmentations: Copy, Add, Subtract, and Merge.Copy Tool
The Copy Tool allows you to transform a segmentation into a perfect copy of another. With Segmentation X selected, enable the Copy Tool and click on Segmentation Y to create a perfect copy of Segmentation X that occupies the same space.
Add Tool
The Add Tool allows you to add the pixel values of a segmentation to another. With Segmentation X selected, enable the Add Tool and click on Segmentation Y to add the pixel values of Segmentation Y to Segmentation X.Subtract Tool
The Subtract Tool allows you to remove the pixel values of a segmentation from another segmentation. With Segmentation X selected, enable the Subtract Tool and click on Segmentation Y to remove the pixel values of Segmentation Y from Segmentation X.Merge Tool
The Merge Tool allows you to transform one type of segmentation island into another. With Segmentation X selected, enable the Merge Tool and click on an island of Segmentation Y to merge the island to Segmentation X.Fast Automated Segmentation Tool (F.A.S.T. ⚡️)
The Fast Automated Segmentation Tool (F.A.S.T.) is an automatic segmentation tool powered by Meta AI’s Segment Anything Model that allows you to rapidly generate 2D and 3D segmentations.- Image encoding, which takes place on the server side. The result of image encoding is embeddings, which are special vector representations of the images that are useful for machine learning.
- Segmentation decoding, which takes place in the browser in real time.
To enable F.A.S.T. for your team, please do the following:
Generating 2D Segmentations with F.A.S.T.
To start segmenting, create a segmentation instance, select the F.A.S.T. tool from the top bar or usingcmd/ctrl + b. Once the tool is selected, hover over a viewport to start embedding computation for a single slice (you will see a loader spinner on the top right of the viewport). You can prompt F.A.S.T. in a few different ways after the embedding computation is complete:
- Bounding Box prompts.
Click + move mouse + clickto draw a bounding box. You will see the segmentation prediction compute in real time while you draw the bounding box.- Once you are happy with the segmentation preview, confirm it by using the button on the right panel or
shift + enter.
- Once you are happy with the segmentation preview, confirm it by using the button on the right panel or
- Instant click.
alt/option + hoverover objects to view a prediction preview. If you are satisfied with any preview, click while pressingalt/optionto confirm the segmentation.
Interpolating 2D Segmentations with F.A.S.T.
Interpolated F.A.S.T. allows you to draw Bounding Boxes to define an interpolation range for a 3D structure that is to be annotated. The process for creating interpolated annotations with 2D F.A.S.T. is detailed below.- Create a new Instance of your desired Object Label by clicking on the “+” in the left hand toolbar
- Select F.A.S.T. in the top of the screen and wait for the embedding computation to complete on Slice X
- Ensure that your F.A.S.T. is set to “2D” mode in the righthand Context Panel
- Create a Bounding Box around the structure you wish to annotate
- Navigate to the end of the range that you want to interpolate across (i.e., Slice Y)
- Repeat Step 3 (and optionally, Step 4) for the structure you wish to annotate on Slice Y
- Once you are satisfied with the annotations, press Enter or click on “Finalize” in the right hand toolbar to generate the pixel masks on every slice between Slice X and Slice Y.
Processing times may increase when interpolating across large ranges. However, please note that all subsequent work across the same range should be much faster, as the embedding computations only have to be computed once per slice.
Firewalls, ad blockers, privacy extensions, and any other browser extensions that block HTTP traffic are known to interfere with FAST.
Dilate & Erode Tool
The Dilate & Erode Tool allows you to expand or shrink the area of a segmentation. With a segmentation selected, useleft click to Dilate (grow) the area of the segmentation and right click to Erode (shrink).
Use the Pixels to Change slider in the right hand Context Panel to control the severity of the dilation or erosion.
Shell / Margin Tool
The Shell / Margin Tool creates an anisotropic shell around a source segmentation with independent expansion values for each anatomical direction (Left, Right, Anterior, Posterior, Superior, Inferior). This is useful for defining clinical target volumes or safety margins around existing structures. To use the Shell / Margin Tool:- Create a new label for the shell (target).
- Select the Shell / Margin Tool from the top toolbar.
- Click on the entity you want to expand from (source).
- Adjust the expansion values (in mm) for each anatomical direction using the sliders in the right hand Context Panel.
- Click Apply to paint the shell into the target label.
Smoothing Tool
The Smoothing Tool helps you remove peaks and valleys in noisy annotations. With the Smoothing Tool selected, useleft click to remove valleys and right click to remove peaks.
Mask Propagation Tool
The Mask Propagation Tool, built on SAM2, is an extremely powerful tool intended for rapid generation of 3D segmentations. To use the Mask Propagation Tool, ensure you have F.A.S.T. (RedBrick Boost) enabled for your Organization and complete the following steps in the Editor:- Navigate to a relatively central slice of an ROI you wish to annotate.
- Annotate a single slice using any Segmentation Tool (e.g. Edge Selection, Adaptive Brush, etc.). After you have created an annotation mask, the Mask Propagation Tool icon will appear.
- Click on the Mask Propagation Tool icon in the top toolbar. The loader icon (a red or green icon in the top-right corner of your viewport) should begin spinning as the Mask Propagation Tool prepares your Series.
- (Optional) if the loader icon in the top-right corner of your viewport remains red, click on it to restart it. Once the loader icon is green, you can proceed.
- In the righthand Context Panel, define the range of slices corresponding to your ROI.
- Note that the annotation mask you created in Step (2) should still be in the center of your slice range. For example, if you want to propagate a segmentation across slices 10-20, the “test” annotation that you created in Step (2) should be on slice 15.
- Click on Propagate Mask (or use the preferred hotkey). The Mask Propagation Tool will begin processing the ROI in the defined slice range.
- Once you are satisfied with the preview, click on Finalize.
For trickier ROIs, you can use Finalize Slice to rasterize a mask on a single slice, touch up the finalized slice mask with the Segmentation Toolkit (e.g. Brush Tool, Contour Tool, etc.) and re-feed it back to the Mask Propagation Tool as input.
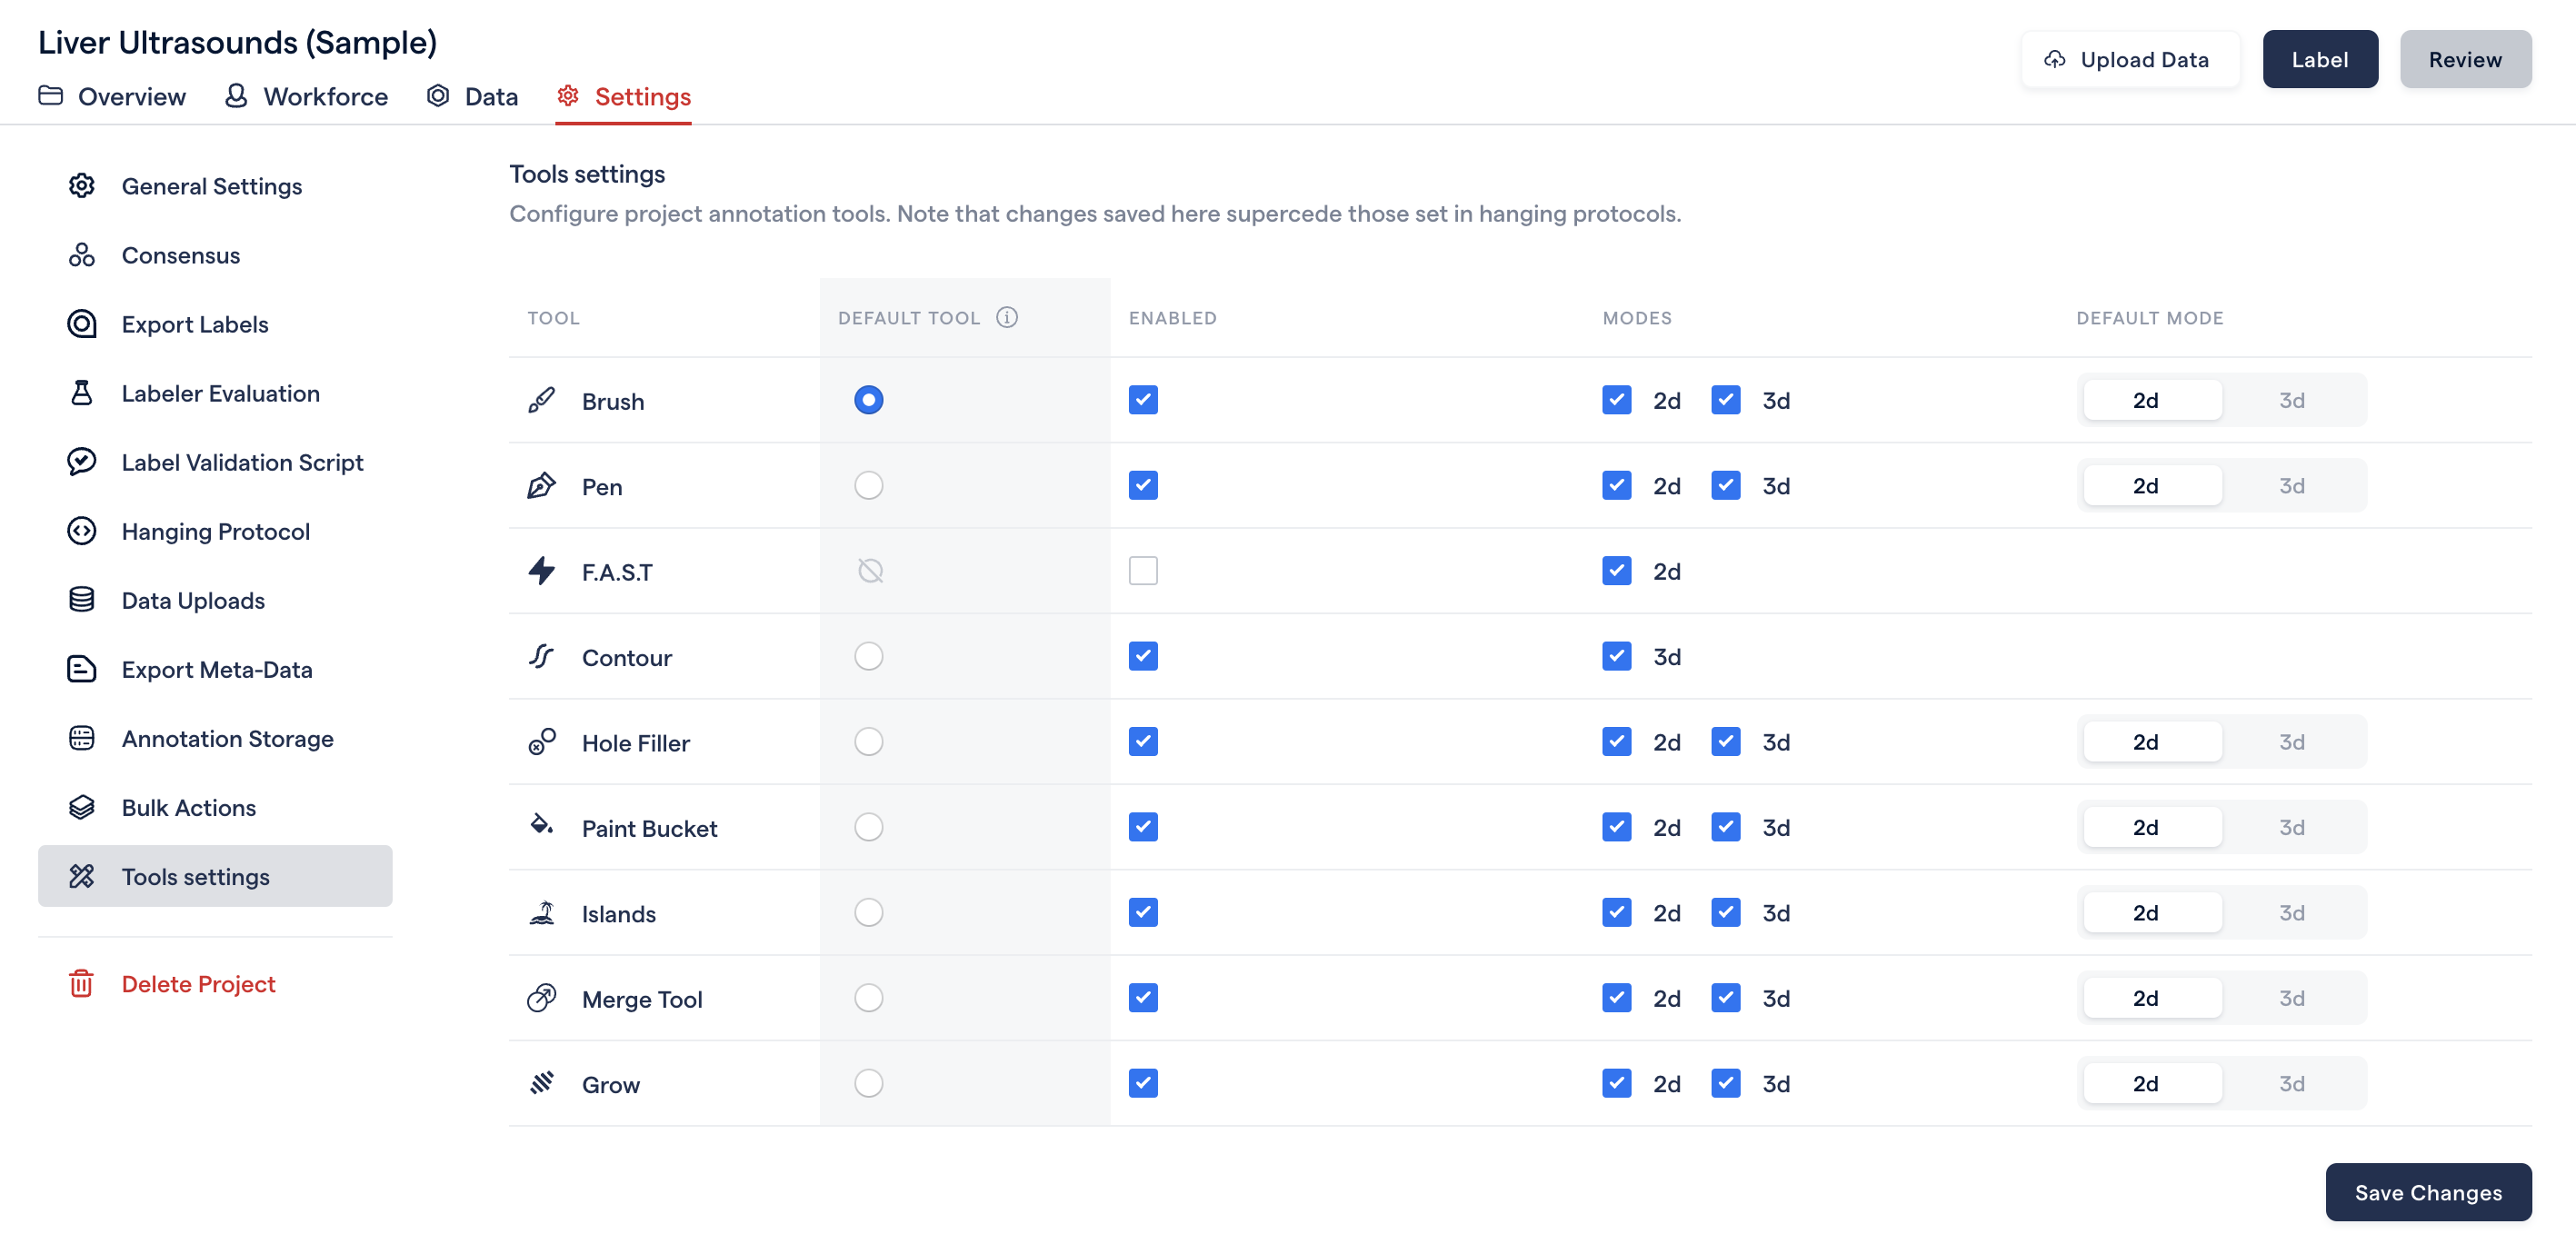
Tool Configuration
Your labeler toolkit can be customized at the Project level by navigating to the Tool Settings page within your Project Settings. Use the checkboxes for each tool to:- set a custom default tool;
- restrict/enable 2D and/or 3D annotation;
- set a default mode (i.e. 2D or 3D);
- enable/disable a Tool entirely;